Crosley record players offer a perfect blend of nostalgic design and modern functionality, making them a popular choice for vinyl enthusiasts. With easy-to-follow instructions, these turntables ensure seamless setup and operation, catering to both beginners and experienced users. Their rich history and commitment to quality make Crosley a trusted name in the world of vinyl records.
1.1 Brief History of Crosley Record Players
Crosley Radio Corporation, founded in the 1920s, revolutionized home audio with affordable, high-quality radios and phonographs. By the 1940s and 1950s, Crosley became a leading producer of record players, known for their innovative designs and accessibility. Today, Crosley continues this legacy, offering vintage-inspired turntables that combine classic aesthetics with modern features, appealing to both nostalgic collectors and new vinyl enthusiasts while maintaining a commitment to quality and user-friendly designs.
1.2 Importance of Following the Instruction Manual
Following the instruction manual is crucial for achieving maximum performance and reliability from your Crosley record player. It provides detailed guidance on setup, operation, and maintenance, ensuring optimal sound quality and longevity. The manual outlines essential safety precautions, such as avoiding water exposure, and helps users understand controls and troubleshooting steps. Adhering to the instructions prevents damage and guarantees a seamless listening experience, making it a vital resource for all users.

Unboxing and Initial Setup
Unpack your Crosley record player carefully, ensuring all components like the turntable platter, slip mat, 45 RPM adapter, and power adaptor are included. Follow the manual for proper assembly and placement on a stable surface to ensure optimal performance and prevent damage.
2.1 What’s Included in the Package
Your Crosley record player package typically includes the turntable unit, a turntable platter, a slip mat, a 45 RPM adapter, a power adaptor, and a comprehensive instruction manual. Some models may also come with additional accessories like a dust cover or RCA cables. Ensure all items are accounted for before setup to guarantee proper functionality and a smooth user experience.
2.2 Checking for Missing Accessories
After unboxing, carefully verify that all components are included. Your Crosley record player package should contain the turntable, platter, slip mat, 45 RPM adapter, power adaptor, and instruction manual. Compare the items with the list provided in the manual to ensure nothing is missing. If any accessories are absent, contact Crosley customer service immediately to resolve the issue before proceeding with setup.
2.3 Placing the Turntable on a Stable Surface
Positioning your Crosley record player on a stable, flat surface is essential for optimal performance. A sturdy table or shelf is ideal, ensuring minimal vibration and movement. Avoid placing the turntable near speakers or other devices that may cause resonance. Level the surface if necessary to prevent uneven operation, which could affect sound quality and record playback. A stable setup guarantees better sound reproduction and reduces wear on the turntable components.
Setting Up the Turntable
Setting up your Crosley turntable involves carefully unpacking and preparing it for operation. Follow the manual to ensure all parts are included and properly installed. This step ensures optimal performance and longevity of your record player.
3.1 Installing the Turntable Platter and Slip Mat
To install the turntable platter, carefully remove it from the packaging and align it with the center spindle. Gently place it down, ensuring it fits securely. Next, lay the slip mat over the platter to protect your records and provide a smooth playing surface. Make sure both are properly aligned and free from dust or debris for optimal performance.
3.2 Installing the 45 RPM Adapter
The 45 RPM adapter is included in the package and essential for playing 7-inch records. To install, locate the adapter and align its spindle with the turntable’s center spindle. Gently press down until it clicks securely into place. Ensure it is stable to prevent wobbling, as this could affect sound quality. Once installed, your Crosley record player is ready to play 45 RPM records seamlessly.
3.3 Connecting the Power Adaptor
The power adaptor is included in the package and essential for operating your Crosley record player. Locate the DC input on the turntable and insert the adaptor’s plug firmly. Connect the other end to a nearby power outlet. Ensure the adaptor is securely plugged in to avoid any power issues. Keep the adaptor away from water and other hazards to maintain safety and optimal performance. This step is crucial for powering your Crosley record player.
Choosing the Right Crosley Record Player Model
Popular models like CR66, CR7002A, and CR8005G offer unique features such as portability, built-in speakers, and Bluetooth connectivity. Consider your needs for size, portability, and additional features to select the ideal model for your vinyl experience.
4.1 Popular Crosley Models (CR66, CR7002A, CR8005G)
The CR66 is a compact, vintage-inspired model ideal for small spaces, while the CR7002A offers portability with built-in speakers. The CR8005G stands out with advanced features like Bluetooth connectivity and a sleek design. Each model caters to different user preferences, ensuring a seamless vinyl listening experience. These models are widely praised for their affordability and versatility, making them top choices for both beginners and seasoned vinyl enthusiasts.
4.2 Differences Between Manual and Automatic Models
Manual Crosley models require users to lift and place the tonearm on the record, offering precise control over playback. Automatic models, however, feature a motorized tonearm that starts and stops with the press of a button or automatically. Manual models suit enthusiasts who value tactile interaction, while automatic models provide convenience and ease of use, making them ideal for casual listeners. Both types ensure high-quality sound reproduction, catering to different preferences and lifestyles.
Operating the Crosley Record Player
Place the record on the turntable, use the cue lever for manual models, and adjust the tonearm for optimal playback. Bluetooth pairing enhances wireless connectivity options.
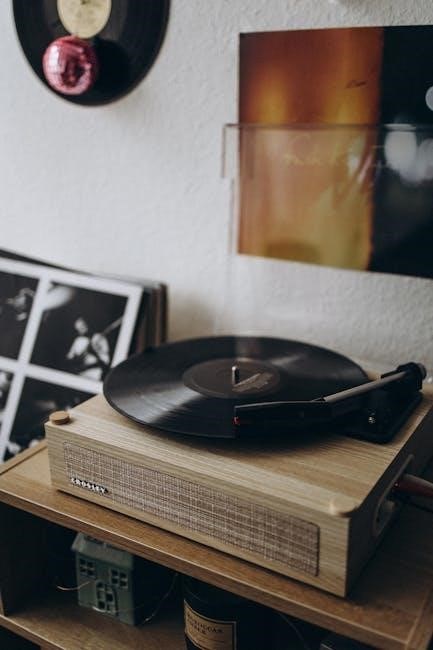
5.1 Placing the Record on the Turntable
To place the record, ensure the turntable is stationary. Gently hold the record by the edges, avoiding fingerprints on the surface. Align the record label with the turntable’s center spindle and carefully lower it. Ensure the record is secure and evenly positioned. This ensures proper playback and prevents damage to both the record and the player.
5.2 Using the Cue Lever for Manual Models
For manual Crosley models, the cue lever is essential for gently lowering and raising the stylus. To use it, press the lever downward to lift the tonearm. Carefully position the stylus at the record’s edge. Once aligned, release the lever to lower it onto the vinyl. Avoid sharp movements to prevent damage to the needle or record. Proper use ensures precise playback and extends the lifespan of your equipment.
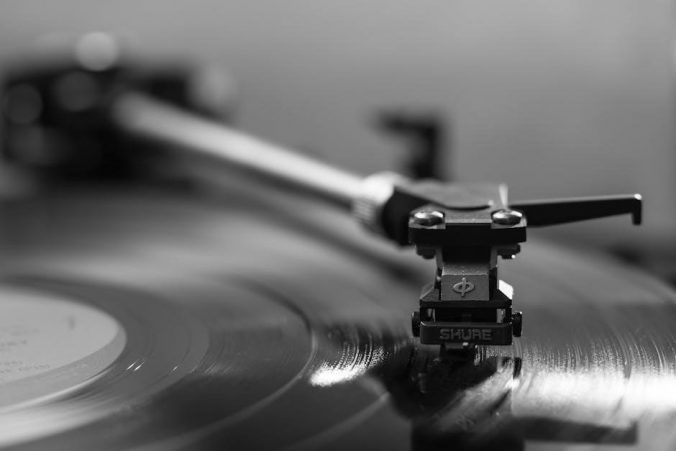
5.3 Adjusting the Tonearm and Tracking Force
Properly adjusting the tonearm and tracking force ensures optimal sound quality and prevents record damage. Locate the counterweight on the tonearm and gently slide it until balanced. Refer to the manual for specific instructions on calibrating the tracking force. Avoid over-tightening, as this can damage the stylus or motor. Adjustments should be made carefully to maintain proper alignment and even pressure on the record surface.
5.4 Bluetooth Pairing Instructions
To pair your Crosley record player via Bluetooth, press the Bluetooth button until it activates. Enable Bluetooth on your device and search for “Crosley.” Select the model (e.g., CR8005D) to pair. Once connected, you’ll hear a confirmation sound. For troubleshooting, ensure both devices are in range and restart if pairing fails. Refer to your manual for specific model instructions to ensure a smooth wireless connection.
Maintenance and Upkeep
Regular maintenance ensures optimal performance. Clean the platter, check the belt, and store records upright. Avoid moisture and use a soft cloth for dusting the exterior.
6.1 Cleaning the Record Player
Clean your Crosley record player regularly to maintain sound quality. Use a soft, dry cloth to wipe the exterior and platter. Avoid liquids, as they may damage components.
Dampen a cloth with distilled water for tougher dust, but ensure no moisture enters the internals. Gently clean the stylus with a specialized brush to remove debris.
For records, use a cleaning kit to remove dirt and static. Regular cleaning prevents skipping and ensures clear playback. Always handle records by the edges to avoid fingerprints.
6.2 Caring for the Stylus and Needle
Regularly inspect and clean the stylus to ensure optimal sound quality. Use a soft, dry brush to gently remove dust and debris. Avoid liquids, as they can damage the cartridge. Handle records by the edges to prevent oils from your skin affecting the stylus. Replace the needle every 500-1000 hours of playtime to maintain performance. Proper care extends the life of your Crosley record player and preserves your vinyl collection.
6.3 Regularly Checking Belt and Motor
Regularly inspect the belt for signs of wear, cracks, or stretching. Replace it if damaged to maintain consistent speed. Lubricate the motor periodically to ensure smooth operation. Check the motor for dust buildup, which can affect performance. Refer to your manual for specific instructions on lubrication and belt replacement. Consistent checks help prevent issues and ensure your Crosley record player runs reliably for years to come.
Troubleshooting Common Issues
Identify and resolve common issues like the record player not spinning or distorted sound by referring to the manual. Ensure proper setup and maintenance for optimal performance.
7.1 Record Player Not Spinning
If your Crosley record player stops spinning, check the power source and ensure it’s properly plugged in. Verify the outlet is functioning and the power button is engaged. Inspect the belt for wear or misalignment and ensure the platter is clean. Consult the manual for troubleshooting steps or contact Crosley customer support for assistance. Regular maintenance can prevent such issues and ensure smooth operation.
7.2 Distorted Sound or Skipping
Distorted sound or skipping can occur due to a dirty or damaged stylus, improper tracking force, or misaligned tonearm. Clean the stylus gently with a soft brush and ensure the record is placed correctly. Check for warped records or debris on the surface. Adjust the tracking force as per the manual and ensure the turntable is on a stable, level surface. Regular maintenance can help prevent these issues and improve sound quality.
7.3 Bluetooth Connectivity Problems
Bluetooth issues with Crosley record players often arise from pairing problems or interference. Ensure your device is within range and Bluetooth is enabled. Restart both devices and attempt pairing again. If issues persist, reset the turntable by unplugging and replugging it. Check for firmware updates and consult the manual for specific pairing instructions. Proper pairing ensures seamless wireless connectivity for an enhanced listening experience.
Accessories and Upgrades
Crosley record players can be enhanced with accessories like record cleaning kits and 45 RPM adapters. Upgrading the cartridge or needle improves sound quality and performance.
8.1 Recommended Accessories for Crosley Models
Enhance your Crosley record player experience with essential accessories like a record cleaning kit, 45 RPM adapter, and turntable slip mat. These items ensure optimal performance and longevity. A record cleaning kit helps maintain vinyl quality, while the 45 RPM adapter is perfect for playing 7-inch records. Additionally, a turntable slip mat reduces friction and protects your records. Always check the package for included accessories and contact Crosley customer service if any are missing.
8.2 Upgrading the Cartridge or Needle
Upgrading the cartridge or needle on your Crosley record player can significantly improve sound quality. Start by powering off your turntable and locating the cartridge. Gently remove the old cartridge and install the new one, ensuring proper alignment; Follow the manufacturer’s instructions for precise installation. This upgrade enhances audio clarity, reduces wear on records, and boosts overall performance. Always consult the manual or contact Crosley customer support for assistance.
8.3 Using a Record Cleaning Kit
A record cleaning kit is essential for maintaining your vinyl collection. Regular cleaning removes dust and debris, preventing scratches and ensuring optimal sound quality. Gently wipe the record surface with a cleaning solution and a microfiber cloth, avoiding the label. This helps extend the life of both your records and the needle. Crosley recommends using a cleaning kit to keep your records in pristine condition.

Customer Support and Warranty
Crosley offers dedicated customer support and a warranty program. Contact their service team for assistance with missing parts or issues. Keep original packaging for returns or exchanges.
9.1 Contacting Crosley Customer Service
To contact Crosley Customer Service, visit their official website or call 1-888-CROSLEY. For issues like missing accessories or troubleshooting, refer to your manual. Retain packaging for returns. Their team assists with product inquiries, warranty claims, and repair services, ensuring a smooth experience for all Crosley record player users. Prompt support helps maintain your equipment’s performance and longevity.
9.2 Understanding Warranty Terms
Crosley record players come with a limited warranty covering manufacturing defects for a specified period, typically one year. The warranty ensures repair or replacement of defective parts. Damage from misuse, normal wear, or improper maintenance is excluded. To file a claim, retain your warranty card and purchase receipt. Refer to the manual for detailed terms and conditions. Understanding your warranty ensures protection and support for your Crosley record player investment.
9.3 Returning or Exchanging Parts
Crosley allows returns or exchanges within a specified period, typically 30 days, for defective or damaged parts. Contact customer service to obtain a Return Merchandise Authorization (RMA) number. Ensure the item is in its original packaging with all accessories included. Shipping costs may apply unless the issue is due to a manufacturing defect. Follow the provided instructions carefully to facilitate a smooth return or exchange process.
Advanced Tips for Optimal Performance
Adjust the counterweight and anti-skate for precise tracking force, ensuring clear sound and reduced record wear. Clean the stylus regularly and use a high-quality record cleaning kit for optimal playback quality.
10.1 Adjusting Anti-Skate and Counterweight
Properly adjusting the anti-skate and counterweight ensures balanced tracking force, reducing distortion and record wear. Start by leveling the turntable. Next, set the counterweight to match your cartridge’s recommended force. Adjust the anti-skate dial to prevent the needle from skating across the record groove. Fine-tune these settings while playing a test record to achieve optimal sound quality and even wear on your vinyl collection.
10.2 Optimizing Placement for Sound Quality
Placement is critical for achieving the best sound from your Crosley record player. Position it on a stable, level surface away from vibrations. Avoid placing it near speakers or in direct sunlight, as this can cause warping. Ensure the turntable is level using the built-in adjusters to prevent distortion. Keep it away from electronic interference sources for clearer playback. Proper placement enhances sound clarity and protects your records.
Leave a Reply
You must be logged in to post a comment.